Graduated Fingerboard Relief and Radius
One of the most powerful instances of ways a luthier built instrument can be superior is the care the luthier takes to implement the fingerboard's relief and radius, since these are critical to the instrument's playability and performance. In this short article I outline some of the issues the luthier accounts for when designing a fingerboard, and give insight into the shop techniques I use to address them. Much of the information I present in this article is just as I learned it from my mentor Hideo Kamimoto, several decades ago. There are also many things that I have learned from my brother, Patrick, a professional musician who worked for Hideo too, and has gone on to a long career as an independent luthier. My contribution has been discovering how to use CNC to address these issues in an easily reproducible way.
When strings vibrate, they travel over a complex curved path, primarily formed by the fundamental frequency and other partials (whole number multiples of the fundamental). The drawing below (courtesy of Wikipedia) shows the harmonic series of a string. Imagine all of these patterns superimposed, and you will have a useful idea of how a string vibrates. The fingerboard must not be perfectly straight, but have a slight concave curve (longitudinally), to allow the strings to vibrate without buzzing against the fingerboard or frets. This longitudinal concavity is called "relief". The best compromise for relief on most instruments is a curve with a constant radius.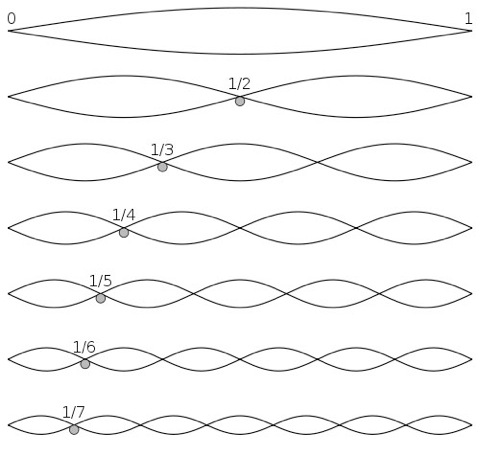
You can take a look at this slow motion image sequence to get a real feel for string motion.
Before discussing relief in more detail, we should briefly consider the lateral dimension of the finger board. Most stringed instrument finger boards have a lateral convexity. This lateral convexity is called "radius". In the violin family, a radius in the fingerboard and bridge is essential so that the bow can isolate one string at a time. A laterally flat finger board, typical on most classical guitars, can be said to have an infinite radius. A relatively high lateral convexity, like that found on the original Fender guitars, is formed by a small radius. Smaller radii are more comfortable for playing chords on a guitar, particularly barre chords, but cause "fretting out", when the string contacts a higher fret during a bend and stops vibrating. Conical fingerboards provide a smaller radius in the lower register near the nut, and a larger radius at the bridge end of the fingerboard, which gives the player most of the benefits of both radii.
An instrument that has a neck flexible enough to pull up under string tension will often have a truss rod installed under the fingerboard, so that relief can be adjusted for a variety of string gauges. Many fretted instruments have necks that are flexible enough to need an adjustable truss rod. Installing heavier strings may require tightening the truss rod to restore the proper relief, while installing lighter strings may require loosening. A modern double action truss rod can increase relief if string tension alone is insufficient to create enough relief.
The necks of violin family instruments are shorter and stouter, relative to string length and tension. They do not pull up significantly under string tension, and do not have truss rods. All of the required relief must be accounted for when the surface of the finger board is planed and sanded to its final shape.
Necks that pull up significantly under string tension create some relief by default, but they may pull up more on the treble side than on the bass side, creating more relief there. In my experience that is more often than not the case on steel string guitars. However the bass strings travel over a wider path; this requires more relief on the bass side. These two seemingly incompatible facts simply require that fingerboard relief needs to be graduated, that is, the fingerboard needs to be prepared with more relief on the bass side than on the treble side. Furthermore, for necks that pull up significantly under string tension, the treble/bass relief differential may need to be larger under no string tension, than what is required under string tension, since necks that pull up significantly under string tension may pull up more on the treble side.
Most factory guitars are manufactured with the fingerboard dead level (longitudinally) on both sides. Under string tension, this may result in more relief on the treble side. It may be impossible to adjust the truss rod to a perfect setting for both sides, when the fingerboard is dead level on both sides under no string tension. The strings may have to be adjusted higher over the finger board to prevent buzzing against the frets, than if the relief were graduated. More string height over the fingerboard/frets requires more effort by the fingering hand, tiring the player sooner, and making difficult passages less feasible.
The string height over the fingerboard/frets is called "action". A higher action allows the player to strike or bow the strings harder, and get more volume. A lower action requires a lighter touch. It is worth mentioning at this point that the virtue of a conical shape, for fingerboards with some radius, extends beyond just enabling comfortable barre chords in the lower register while eliminating fretting out; a conical finger board can make the action more consistent everywhere, across all strings, and in all registers. Since finger boards flare wider as they extend from the nut toward the bridge, the radius should increase progressively. This applies to violin family instruments, as well as most guitars.
Like most everything, there is a point of diminishing returns with relief. Increasing relief and the relief differential makes the action relatively higher in the middle register than in the lower and upper registers, particularly on the bass side. There is a useful balance of relief and action that must be considered.
A good luthier will prepare the fingerboard with a proper relief differential and radius. This can be done to some extent when milling frets or re-fretting a fretted instrument, or when re-planing the fingerboard on a violin family instrument. It can be done thoroughly when designing a new fingerboard. It is usually done by hand, and requires considerable experience and attention to detail to do consistently well. I have been getting better at doing it by hand, over the years, but for building new instruments, I wanted to develop a more easily reproducible process.
For my archtop guitars, which require a relief differential, I get the best results by milling the differential at the time the fingerboard is radiused, using CNC. It is possible to mill the fingerboard so that it has a slight negative relief (convexity) on the treble side, is dead level down the middle, and has a slight positive relief (concavity) on the bass side. Then once the fingerboard has been installed, it can be straightened on either side, or down the middle, by adjusting a modern double action truss rod. Minimal shaping is required to finish the surface, just enough sanding to remove machining traces and level the inlays. The relief differential can be accomplished without any part of the fingerboard being much thinner or thicker than the median. Inlay pockets can be made to follow this complex surface, so that the inlays will be consistently the same thickness everywhere.
The drawing below shows the surface of a conical fingerboard with graduated relief. You are looking down the fingerboard from the nut, towards the bridge; you can see the negative relief on the treble side at your left, and the positive relief on the bass side at your right. The differential is 1/32", negative 1/64" on the treble side, and positive 1/64" on the bass side. This 1/32" relief differential is implemented over the entire length of a 20 fret finger board. Under string tension, and with a truss rod adjustment, a treble/bass relief differential of about 1/64", evaluated from the 1st through 12th frets, can be obtained.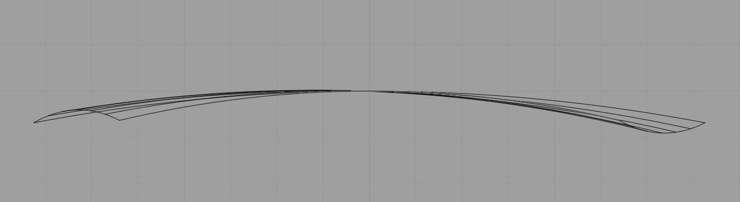
When a guitar fingerboard has a suitable relief differential and conical shape, the action can generally be set approximately 1/64" lower at the 12th fret than will be possible if the finger board has been prepared with no differential and a single radius. It might not sound like much, but when you consider that a low action is usually three or four 64ths at the twelfth fret on the treble side, you can see that optimizing relief and radius differentials can produce a 25-33% improvement. This lower action allows both good dynamic range and relatively effortless fingering. Having found a method to more consistently implement a good relief differential and conical surface, my expectations for action have been considerably changed.
As you can see, designing and constructing a proper fingerboard is a somewhat involved task. It draws on a specialized body of knowledge and skill. It also draws on the luthier's sensitivity to the needs of the person who will be using the fingerboard to play music. A luthier is often able to 'fix' a problematic fingerboard. When building a new instrument, he or she always strives for a fingerboard that has good relief and radius.
Text and finger board drawing Copyright July 16, 2010 by Michael McCarthy.